Make Drag and Drop Easier When Using a Windows 7 or 8 Touchpad

Do you like to use the touchpad on your laptop instead of a mouse? Then you might consider enabling a feature of Windows 7/8 that makes the operation of dragging and dropping easier.

In this tutorial iam going to show you how to enable this feature Normally, drag and drop takes two hands, one to hold down the left touchpad button and one to move the selected object. However, Windows 7 and 8 come with a Control Panel setting called ClickLock that provides a way to let you use just one hand. Here�s how it works.

Follow the Below steps:

Step 1: Open Control Panel. In Windows 7 click the entry in the Start menu. In Windows 8, enter the keyboard shortcutWinkey+X and choose Control Panel from the menu that opens.


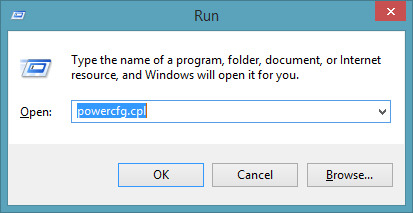
 (or)open Run and type �control� without inverted commas then Control Panel will open


Step 2:  In Control Panel View and Click on Mouse Icon


Step 3:   The Mouse Properties dialog box will open.


Step 4:   Find the section named "ClickLock" and put a check by the entry "Turn on ClickLock".

     Step 5:  Click the button "Settings" and a small window opens where you can set the delay time. This is the time you have to hold down the left trackpad button before the      
   cursor is locked to the clicked item. (Graphic below) Be aware that this setting will affect the mouse also.


Step 6:    Click "OK" and "OK" . All is Done                                                                           

Note: Now when you put the cursor on an object, click and hold down the trackpad (or mouse) left button, it will lock the cursor on the object after the specified delay time. The object can then be moved. To release the cursor, click again.

Get your own favorite tip published! Know a neat tech tip or trick? Then why not have it published here and receive full credit? Click here to tell us your tip.


Rate this Article :


 Note :
 If any have doudts comment below or send message in feedback&help or
 Email :help@techradarweb.uservoice.com 
 To share your ideas with us Click Here
 Follow and Like us from Below Links


  • Digg
  • Del.icio.us
  • StumbleUpon
  • Reddit
  • RSS

How To Copy and Paste in Command Prompt(cmd)

In This Tutorial I am going to show you how to copy and paste in command prompt (cmd)  Sometimes it is convenient to copy something from a document or file and paste it into the Windows command line. Long commands are easily mistyped and a copy-and-paste operation is often the best way to proceed, The usual keyboard shortcut Ctrl+V doesn�t work but there is an easy way to enable copying and pasting into the command line.

Follow The Below Steps:
Step 1:  Open a command prompt


Step 2:  Click the little icon in the upper left corner of the command prompt window .In the menu that opens, choose �Properties� (Example shown in figure below)


Step 3:  In the dialog box that opens, make sure the "Options" tab is selected and then place a check by �QuickEdit Mode� (Shown in figure below) Click the �OK� button


Step 4:  Now whenever you want to paste some text into the command prompt, copy it to the clipboard the usual way and then right-click on the desired location in the command line. The copied text will be pasted.

This tip applies to Windows XP, Vista, 7, 8. And there you have it - no more struggling with trying to type long complicated commands.

Get your own favorite tip published! Know a neat tech tip or trick? Then why not have it published here and receive full credit? Click here to tell us your tip.


Rate this Article :


 Note :
 If any have doudts comment below or send message in feedback&help or
 Email :help@techradarweb.uservoice.com 
 To share your ideas with us Click Here
 Follow and Like us from Below Links

  • Digg
  • Del.icio.us
  • StumbleUpon
  • Reddit
  • RSS

How To Create Vpn connection and list of vpn servers

In this tutorial I am going to show you How to Establish a Vpn connection.Generally Vpn connections are used for access the blocked sites


What is Vpn?

A virtual private network (VPN) extends a private network across a public network, such as the Internet. It enables a computer to send and receive data across shared or public networks as if it were directly connected to the private network, while benefiting from the functionality, security and management policies of the private network.[1] This is done by establishing a virtual point-to-point connection through the use of dedicated connections, encryption, or a combination of the two.


Follow the below Steps to Establish a Vpn Connection :

Step1 :  ?l??k ?n Start � Run , if you are Using Windows 8, Then Click on start and search for Run, or just hold down windows key and press  � R �.


Type   �control� without inverted commas in the Run box and Hit Enter. Control panel will open

Step2 : click on internet option. If your not able to see internet option then change the view to small icon (or)large icon 


Step3 :  A new popup box will appear then select   connections>>Add Vpn


Step4 : In the  internet address box type vpn server address from the  below list Eg: 67.212.175.123 and hit Create


Step5: Later it will ask User name and password Enter the user name and password from below list W.r.t to location your selected

     Eg: Username: freevpnaccess.com  password : 2259


                                                                You are all done.


LIST OF SERVERS :                                                                                                                 
                                                                                                                       
Location
VPN Server
Protocol
Username
Password
US - Chicago
67.212.175.123
PPTP
freevpnaccess.com
2259
UK - London
83.170.84.216
PPTP
freevpnaccess.com
8513
Canada - Montreal
184.107.164.10
PPTP
freevpnaccess.com
2188
NL - Haarlem
212.7.192.139
PPTP
freevpnaccess.com
5387
US - Miami
69.60.121.29
PPTP
freevpnaccess.com
2860
UK - Maidenhead
94.76.233.203
PPTP
freevpnaccess.com
2845


Recevie Our posts Directly to your in inbox ! Signup for our Email News Letter .Click here to Signup.

Get your own favorite tip published! Know a neat tech tip or trick? Then why not have it published here and receive full credit? Click here to tell us your tip.

  • Digg
  • Del.icio.us
  • StumbleUpon
  • Reddit
  • RSS

How To Enable Hibernate In Windows 8 & 8.1

Lots of Things had been Changed in Windows 8  & 8.1 Compared to Windows 7 . Some of the Settings has been Disappeard In This tutorial I will show You how to enable Hibernate Option in Windows 8 & 8.1 


What is Hibernate ?
                        
                        Hibernation is powering down a computer while retaining its state. Upon hibernation, the computer saves the contents of its random access memory (RAM) to a hard disk or other non-volatile storage. Upon resumption, the computer is exactly as it was upon entering hibernation. When used to save power, hibernation is similar to sleep mode and saves more power at the cost of slower resumption.


Steps To Enable Hibernate in Windows 8 & 8.1 

Step 1: Press Win + W key  to open up Setting search menu. Then Type �Power� , Windows will Show you Few Results, You have to Click on �Power Option�  Now From the Left Pane, Click on Choose What the Power Button do.

                                                                    (or )

                         Press Windows + R to get �run� window and type �powercfg.cpl�


                      image

                                     Hit enter. Now you will be lead to �Power options� window.


Step 2: Then on Next Screen Click on  Change Settings that are currently Unavailable.


Step 3:  Now Scroll Down to �Shutdown Settings� Section, and Check  Hibernate box to Enable it and Click on Save Changes.


Step 5: Everything is done, Now next time whenever you need to Hibernate your PC, just Move your Mouse pointer to right corner of your screen to Show up Charm screen, Click on Setting> Power.


In Windows  8.1 when you Right Click On the Start Button you can see hibernate Option there also


                            image


Recevie Our posts Directly to your in inbox ! Signup for our Email News Letter . Click here to Signup.

Get your own favorite tip published! Know a neat tech tip or trick? Then why not have it published here and receive full credit? Click here to tell us your tip.


  • Digg
  • Del.icio.us
  • StumbleUpon
  • Reddit
  • RSS