How to Install Windows Phone 8 Apps from SD Card

How to Install Windows Phone 8 Apps from SD Card in Order to Save Phone Memory Space : We Have Already Discussed about Windows Phone 8 Features in Nokia Lumia Smartphones.Microsoft Windows Phone 8 is all New Operating System Platform For Present as well as Upcoming Smartphones.If Your are Microsoft Windows Fan then Having a Windows Phone is the Best You can do which makes sure that all your Windows Works or Tasks can be easily done on a Microsoft Windows Smartphone.Earlier Windows Phone were not very Much Popular because of Lack or Unavailability of Desired Applications which limits the Use of those Windows Phone But in Windows Phone 8 You don�t have to Worry About these Applications.Windows Phone Store is Full of Apps of all Kinds where you can get all the Popular Android Apps like Wechat,Whatsapp,Angry Birds or Temple Run etc For Your Microsoft Windows Smartphones.There are so much so much apps available on Windows App store that you run out of Your Internal Phone Memory while Installing these Apps.You might be Downloading Apps From Windows App Store to Install them on Your Windows Phone 8 Devices but that�s not the Only Way.If You are Having a Slow Internet Connection on Your Smartphones then it becomes a Headache Downloading and Installing Apps From Windows Phone Store So to Avoid these Headache Here is a simple and Easy Solution For this Problem you can learn How to Install Windows Phone 8 Apps from SD Card From here.You can Download Your Favorite Windows Phone Apps on Your PC or Laptop and Then Transferring these Downloaded Apps to SD Card and then Installing From the SD Card or Memory Card which in turns save Your Valuable Time as well as Space.This Method Becomes very Much Useful if You are Using a Windows Phone 8 with a very Low Internal Storage Space.Therefore in Such Cases SD Card or Memory Cards become Pretty Useful.Read Below Guide on How to Install Windows Phone 8 Apps From SD Card or Memory Card Directly.

What is the Need of Installing Apps From SD Card ?

How to Install Windows Phone 8 Apps from SD Card : For Some User this Question might be Silly or Funny But it is Very Good Question.Why Do we Require to Install Apps From SD Card when we can Directly Install it through Internet ? � The Reason Using SD Card For App Installation is that it saves a lot of Phone Memory Space.When You Download Apps From Windows Phone Store they are Downloaded and Installed in Your Windows Phone.But What About the File from which it has been Installed ? � The Installation File is not deleted and Hence Occupies Your Phone Memory Storage Space which Means the More apps you Install Directly the More Space will be Wasted in retaining the Installation Files.That�s why we Require Installation of Apps Through SD Card.See Below Instructions on How to Install Windows Phone 8 Apps from SD Card.
Windows Phone First

Requirements For Installing Apps From SD Card

  • First and Foremost Internet Connection is Required For Downloading Apps From Computer if You have Already downloaded then no need.
  • Your Windows Phone 8 Must Have an SD Card or Memory Card since not all Windows Phone 8 Devices Supports SD Card.
  • Therefore Insert SD Card into Your Windows Phone 8 SD Card Slot First.
Note - It is Recommended to Use a SD Card with Higher Rating so as to get Faster Processing Speed If You buy a Low Quality SD Card then there are chances of Data Loss as well Slower Processing Speed.Always Purchase a High Quality SD Card of Reputed Companies like Sandisk ,Kingston,Transcend etc.Don�t Use Cheap SD Card�s.Read Below How to Install Windows Phone 8 Apps from SD Card Full Guide.
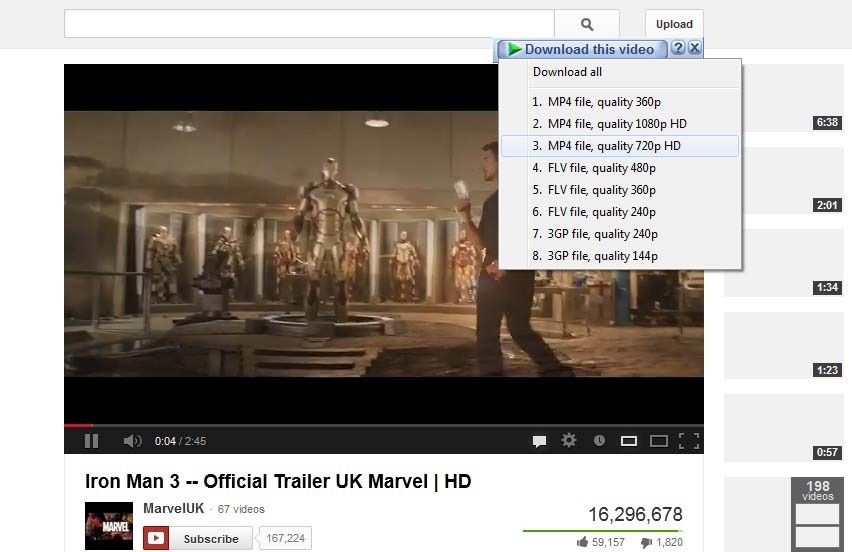
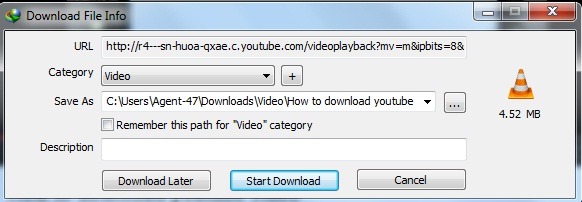
How to Install Windows Phone 8 Apps from SD Card : Steps to Follow

Step -1 : Downloading Windows Phone 8 Apps to PC
  • First of all You need to Download the Desired Windows Phone 8 App on Your Computer or Laptop Through Internet.
Note - You can Also Use Already Downloaded Apps Stored in Your PC or Laptop.
  • Now Scroll Down to Bottom of the Page and Select the Option �Download and install manually� situated at the Left Bottom as shown below.
How to Install Windows Phone 8 Apps from SD Card
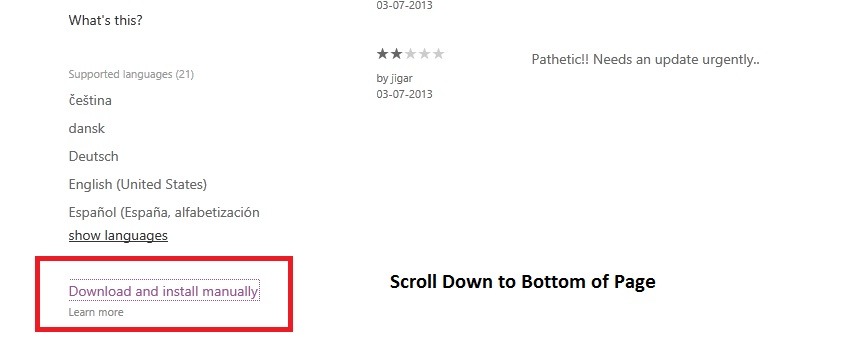
    • Just Download the File it will be in .XAP Format and Save it to Your Computer.

Step -2 : Moving Apps From PC to Windows Phone 8
  • Connect Your Windows Phone 8 to Your PC or Laptop Using the USB Cable Provided with Your Windows Smartphone.
  • Wait for the Drivers to Be Installed to Detect Your Windows Smartphone so be Calm and Patient.
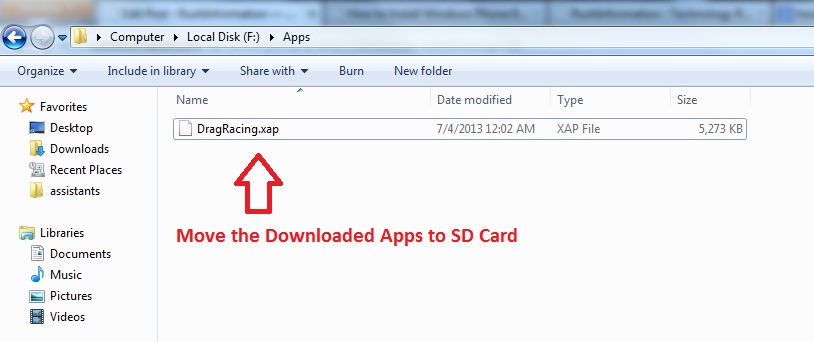
  • After Successful Installation You will see Windows Phone Memory and SD Card Memory in My Computer.
  • Now Move the Downloaded .XAP File to SD Card Memory as shown below.
How to Install Windows Phone 8 Apps from Memory Card
Step � 3 : Installing Apps From SD Card
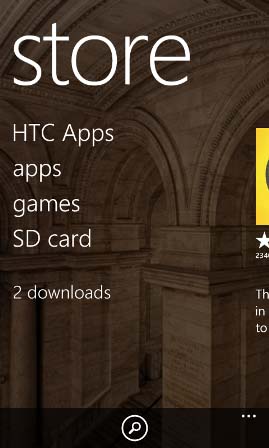
  • Disconnect Your Windows Phone and Open Apps Store.
  • Here You will See a New Category as SD Card apart from the default games,apps or music categories.
How to Install Windows Phone Apps from SD Card
Note - It has been Noticed that sometimes it takes some time in-order to Display the SD Card Category after moving the Apps to SD Card therefore if it is taking too much of time it is better to Restart Your Windows 8 Phone and Hence it will start Showing SD Card in App Store.
  • Now Select the SD Card and there you will shown the list of all apps Present of SD Card For Installation.
  • Just Choose your Desired App which You want to Install and Select Install as shown below.
How to Install Windows Phone 8 Apps from SD Card
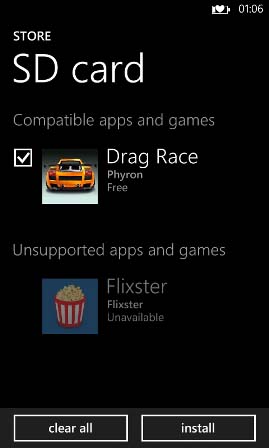
  • Wait For the Completion of Installation of App.
  • After Installation Check out your apps List you will find it there.
  • That�s all and You are all Done.

  • Digg
  • Del.icio.us
  • StumbleUpon
  • Reddit
  • RSS

How do I create shutdown shortcuts in Microsoft Windows 7?

Creating shortcuts to shut down or power down a PC running Microsoft Windows 7 is easy, but it does require specific commands.
One of the most often-requested Microsoft Windows tweaks is for shortcuts that shut down, power down, and restart a Windows session. The procedure for Windows 7 is very similar to that of Vista and XP, but now you can pin those freshly created shortcuts to the Start Menu or the Taskbar or both.

Creating a shortcut

Creating a shortcut should be familiar to almost everyone, but we will walk through the process just for clarity. There are other ways to accomplish this task, but this is my preferred method. First, right-click on a clear spot on the desktop and navigate to New | Shortcut, as shown inFigure A.

Figure A

Navigate the menu to create a new shortcut.
When you click the Shortcut menu item, you will arrive at the input screen shown in Figure B. This is where you will enter the specific command strings to make your new shortcut do what you want it to do.

Figure B

Enter the command for your new shortcut.
For our example, we will enter the specific command that will shut down a Windows PC. Type the following command into the box and then click Next.
Shutdown.exe -s -t 00
The next screen (Figure C) asks you to name the shortcut. I suggest you name the shortcut to correspond to the action it will perform. In this case, we name it Shutdown.

Figure C

Give it an appropriate name.

New icon

Technically, you could stop here, but I prefer to give these shortcuts an icon that will help me remember what it is that they do. In Windows 7, changing an icon is similar to how you changed icons in previous versions of the operating system.
Right-click on the icon in question to get the context menu shown in Figure D and then navigate to the Properties menu item.

Figure D

Find Properties on the menu.
From the Properties control panel, shown in Figure E, select the Change Icon button.

Figure E

Select Change Icon.
The next screen (Figure F) will show you a list of potential icons. Choose the one you want to use and click the OK button twice.

Figure F

Choose your icon and click OK.
You should now have a new shortcut on your desktop. When you click the shortcut, your PC will shut down, so make sure you save your work before you test it.

Windows 7 features

One of the nice features of Windows 7 is that you can pin your new shortcut to the Start Menu and/or to the Taskbar. I am a big Taskbar user myself so that is where I want to put it. Right-click the shortcut to get the context menu and click the Pin to Taskbar menu item (Figure G).

Figure G

Pin the shortcut.
Once the shortcut is pinned (Figure H), you will always have access to a quick shutdown.

Figure H

Shut down anytime.

Additional shortcuts

There are several shutdown and power down commands that you can make into shortcuts. Creating shortcuts for these commands works exactly the same as our example shutdown shortcut.

Restart Computer

Shutdown.exe -r -t 00

Lock Workstation

Rundll32.exe User32.dll,LockWorkStation

Hibernate Computer

rundll32.exe PowrProf.dll,SetSuspendState

Sleep Computer

rundll32.exe PowrProf.dll,SetSuspendState 0,1,0

Bottom line

These shortcut tweaks can be real time-savers, that is for sure. Do you take advantage of them? What other little tweaks are you especially fond of and willing to share?

  • Digg
  • Del.icio.us
  • StumbleUpon
  • Reddit
  • RSS

How to Unbrick Samsung Android Phones with One-Click UnBrick


Normally Samsung android phones are so secure to flash. But you are unlucky and got your phone bricked during flashing, rooting or upgrading.

Here is a good news for You � A developer come up with a software called One-Click UnBrick for Samsung android phones. This small utility uses Odin to repair our Samsung phones. Almost all Samsung phones with android �clair and above can be repair with this tool (few exceptions � it is working on some Android 1.5 too)


Requirements

Complete Step-By-Step Instructions:
  1. Extract the "One-Click.jar" file using 7zip or any other extracting tool. Now you will get a "OneClick" folder.
  2. Copy the "OneClick.jar" file and paste it into the "OneClick\heimdalloneclick\resources\HeimdallPackage" folder.
  3. Right-click on the "oneclickloader.exe" file and choose "Run as Administrator".
  4. Proceed with the installation of Heimdall.
  5. After the installation is complete, you will see the the One-Click UnBrick interface.
  6. Connect the phone to computer via USB and click on the "unsoft brick" button to recover your bricked Samsung android phone.
This method was originally posted via XDA-Developer original thread.
Shared By Drivers Guru �

How to Unbrick Samsung Android Phones with One-Click UnBrick

  • Digg
  • Del.icio.us
  • StumbleUpon
  • Reddit
  • RSS

How to Show Hidden Files on Flash Drive : FIXED

Have You Ever Faced an Issue like You have Saved data on Your Flash Drive and When Connected to Computer it Shows the Flash Drive Empty ? � So Here in this Post I am Going to Tell you the Whole Procedure to Fix this Issue i.e How to Show Hidden Files on Flash Drive.Most of the Users try Reconnecting the Flash Drive again and again and Even they try Formatting the Flash Drive thinking the Flash Drive to be Faulty.So Before Formatting You must Verify and Perform all the Diagnosis to Fix this Issue.You see some occupied space in Flash Drive but When You open it you find it empty.Even after Enabling the Option Show Hidden Files in Windows the Flash Drive still appears to be Empty.This is generally Caused by Virus that basically Hides your Data Completely making it invisible.So Here is a Step by Step Guide on How Show Hidden Files on Flash Drive Using Command Prompt.

How to Show Hidden Files on Flash Drive : Steps to Follow

  • First of all Go to Start and then Open cmd ( Command Prompt ) as an Administrator by typing cmd in RUN Dialog Box
  • Type the Flash Drive Drive Letter i.e. For Example if Drive Letter is E Type e: and Press Enter

  • Next Type �dir\a:e� Without Using the Quotes Here dir stands For Directory and the Command \a:m is Used to Show Hidden Files Only
  • After Seeing the Hidden Contents in Flash Drive Under Cmd now we need to Make them Visible in Windows
  • Type attri -h -s -r *.* ( Remember the Spaces between the Characters) and then Press Enter as shown below in the ImageHow to Show Hidden Files on Flash Drive
Info - attri Means Attributes , -h is Used to Remove Hidden Property on the Files Present , -s is Used for Deactivating properties set as system Files , -r Signifies Removing Read Only Properties ,*.* Signifies a String of Characters Used for Identifying the Name of Files Present in the Flash Drive
Note - If you find any mailicious aur suspicious Files you can delete that file by typing the Command del followed by the Extension of that File for Example � del Suspicious.exe
  • Type �exit� without Using Quotes to Exit from Cmd
  • Now Go to My Computer and Open Your Flash Drive and You Will find Your hidden data it will be recovered and will now be displaying
  • That�s all and You are all done

  • Digg
  • Del.icio.us
  • StumbleUpon
  • Reddit
  • RSS

How to Download Youtube Videos Using IDM � Simple Guide

IDM i.e Internet Download Manger is one of the Fastest Download Manager that can download almost all kinds of files.By Using Interned Download Manager you can easliy download Youtube videos.How to Download Torrent Files Using IDM : Faster and High Speed You will not only able to Download Youtube videos only but it will allow you to download any videos from your favorite sites. Internet Download Manager also provides you the Option to select which quality of video you want to Download i.e 240p,360p,480p etc.I have seen most of the Users finding difficulty in Downloading Youtube Videos.So Here in this Post I am going to tell you a very simple Way to Download Your Favorite Youtube videos using IDM.Here below is a Step by Step Guide on How To Download Youtube Videos Using IDM.How to Password Protect Your USB Flash Drive : USB Secure

How to Download YouTube Videos Using IDM : Steps to Follow

  • First of all you need to Download and Install IDM on your System.
Note - If you face difficulty in Integrating IDM with Your Browser then Visit Here to Fix this Issue.

  • Now you will be shown Download video option and there Just Perform a Left Click to Select the Quality of Video which you want to Download as shown below in the Image.how to download youtube videos using idm
  • Now it will ask you to Start Download and There Click Start Download and your video will start Downloading shortly as shown below in the Image.how to download youtube videos using idm
  • Thats all and You are all Done.

  • Digg
  • Del.icio.us
  • StumbleUpon
  • Reddit
  • RSS

How to Increase YouTube Buffering speed � Faster and High Speed

YouTube is World�s Largest Video Sharing Site With Over 3billion Views How To Stop Receiving Emails From Facebook  Daily where You can Easily Share , Upload or Watch Videos Just For Free.Watching Videos on YouTube is of Great Fun if You have a Powerful Internet Connection But the Same thing Can become a Nightmare for those Users having a Slow Speed Internet Connection because of Slow YouTube Video Buffering.How to Play Youtube Videos Using VLC Media Player So Here in this Post I am Going to Tell You Some Important Tricks by Which You Can Easily Increase YouTube Buffering Speed and thus Enjoying Watching the Videos Online.Here below is a Step by Step Guide on How to Increase YouTube Buffering Speed Manually.How to Download Torrent Files Using IDM

Factors Responsible For YouTube Buffering Speed

    • YouTube Buffering Speed Primarily Depends on the Speed or Bandwidth of Your Internet Connection.

How to Increase YouTube Buffering speed : Tips and Tweaks

1 � Increase Your Internet Speed

This is the Best Method to Increase  YouTube Buffering Speed by Increasing Your Current Internet Speed Up-to 20% .I have Already Discussed in My Previous Posts on How to Increase Internet Speed by 20% How to boost and Increase your internet speed

2 � Use YouTube Feather Beta

YouTube Feather Beta allows You to Watch Your Favorite Videos By Providing the Lowest Latency i.e By Increasing Buffering Speed.YouTube Feather Limits Some of  its Features being displayed to the Viewer�s page like Hiding the Comments,Removing Like or Dislike Option and thus Increasing the Buffering Speed Top 10 Best Android Phones Under 10000How to increase YouTube Buffering speed

Restrictions or Limitations :

  • No Option will be Displayed to Like or Dislike the Video anymore
  • You Will See Only 5 Related Videos being Displayed on the Page

  • You will Not be Able to Comment Anymore

Join YouTube Feather Beta From Here

Difference Between Normal and Feather YouTube PageHow to increase YouTube Buffering speed

3 � Use YouTube Open DNS Server

For Windows XP Users

  • Open Control Panel From the Start-menu
  • Go to Network Connections
  • Select Your Internet Connection and Open Properties by Doing a Right Click
  • Choose Internet Protocol (TCP/IP) and Select Properties
  • Now Put the Following Values in Preferred DNS and Alternate DNS
  Preferred DNS  � 208.67.222.222
  Alternate DNS   � 208.67.220.220

For Windows 7/Vista Users

  • Open Control Panel From the Start-menu
  • Go to Network and Internet and Then Select Network and Sharing Center
  • Select Change Adapter Settings Located on the Left hand Side
  • Select Your Internet Connection and Open Properties by Doing a Right Click
  • Choose Internet Protocol Version 4 (TCP/IP) and Select Properties
  • Now Put the Following Values in Preferred DNS and Alternate DNS
  Preferred DNS � 208.67.222.222
  Alternate DNS    � 208.67.220.220

4 � Use SpeedBit Video Accelerator

SpeedBit Video Accelerator Comes in Both Free as well as in Premium Version.Free Version Supports only Normal Quality Video Acceleration Whereas Premium Version Supports Both Norman and HD Quality Acceleration.

Free Download SpeedBit Video Accelerator

5 � Increase Buffering Speed by Using Tricks

  • Go to RUN and type system.ini in the Dialog Box and Press Enter
  •  It Will Open in a Notepad File
  • Paste the Following Code in the Notepad File ( Make Backup of System.ini File if You are afraid to Make the Changes )
page buffer=100Tbps
load=100Tbps
download=100Tbps
save=100Tbps
back=100Tbps
search=100Tbps
sound=100Tbps
webcam=100Tbps
voice=100Tbps
faxmodemfast=100Tbps
update=100Tbps
Note - Don�t Remove the Original Content From the Notepad Just Paste it Below Where the Content Ends

6 � By Changing Video Quality

Try Lowering the Video Quality to 240p or 360p to Increase the Buffering Speed if Quality of the Video Doesn�t Matter. Top 10 Best Android Phones Under 10000

  • Digg
  • Del.icio.us
  • StumbleUpon
  • Reddit
  • RSS